
7 Simple Steps To A Great Project Plan
I have been doing project delivery for over 20 years now and it still amazes me that so many people struggle to build even the most basic of project plans.
So in the interests of free knowledge, I’d like to share with you my basic and practical approach, in 7 easy steps, that should have you building quality project plans in no time! The approach is nothing special, is based on Prince II principles and is supplemented with my own personal experience. Whilst there is a level of detail that you can adjust to suit your project my top tip is to follow the steps in sequence, changing only the specifics for your particular project.
As I say, this is my approach and I’m happy to take feedback. However, if you follow the steps you will be building project plans and the supporting documents required for a quality project delivery in no time, whether it’s a small personal project at home or a large scale implementation for your clients. Enjoy!
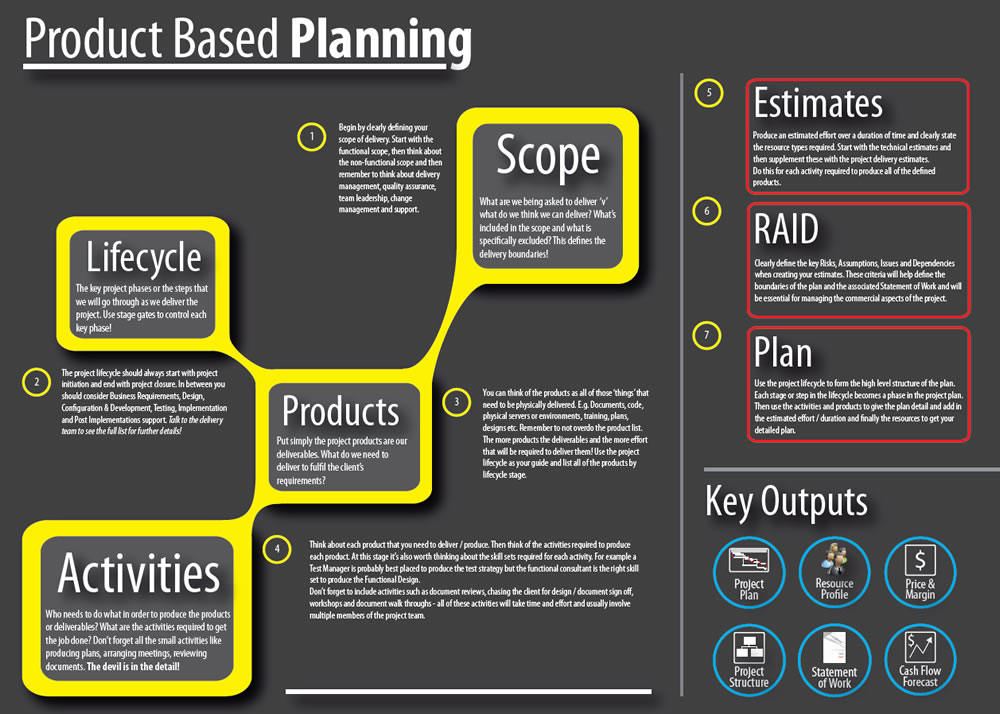
Step 1 – Understand And Qualify The Scope
Clearly define the scope of the project. Understand what needs to be delivered, what the client expectations are, what features or functions need to be included in the delivery. As well as understanding what the client has asked for. Also consider the softer elements of the project scope such as quality assurance, delivery review cycles, team leadership, stage gate reviews etc. Think about any material costs that you may have such as hardware, software licenses and other equipment needed to deliver to the clients expectations. Finally, if you have to make any assumptions then qualify them if possible and always document them in your assumptions log!
Step 2 – Define Your Project Life-cycle
This may seem fairly simple but is often overlooked and if not considered properly will leave your project plan without form or function. So, think about what phase of the life-cycle your project will start and end. Most typical software projects will follow the typical life-cycle of Initiation > Requirements Definition > Design > Configuration & Build > Testing > Implementation > Support. Defining the structure of your project life-cycle helps you break down your thinking for the delivery approach, gives structure to your plan and helps you to put your deliverables into the right project phase ‘buckets’.

An example of a typical software project life-cycle
Step 3 – Understand Your Deliverables
Once you know your scope and you have defined your project life-cycle then you can start to define what it is that you will physically deliver and group these deliverables by the phases in your project life-cycle. Deliverables will vary depending upon the type of project that you need to deliver but in a software project they could be things such as a business requirements document, an end to end business process, a detailed functional design document, a fully configured server, a development / test / production environment, a test plan etc. Each deliverable will be unique and will be the final output for a particular phase of the project. Simply list these out on a piece of paper or in a spreadsheet at this stage, making sure that they align to a life-cycle phase.
Step 4 – Activities
Deliverables typically don’t magically appear without any effort! So, think about the activities required to produce each deliverable. For example, you may plan some client workshops, facilitate the workshop, document the outcome of the workshop and then produce a draft business requirements document that you then publish, engage with the stakeholders for feedback and then rework and publish the finished document ready for sign off. All of these tasks or activities are needed to produce the final deliverable or product. All you need to do at this stage is list the activities for each deliverable and then move onto the next stage.
Step 5 – Estimation
It’s now time to start adding in some detail to the deliverables and the activities that we defined in the previous steps. Most project managers, no matter how much experience we may have, will most likely need some input at this stage. For more complex and technically demanding projects I highly recommend that you engage your technical team and colleagues with this next step of estimation, at least for the technical activities and deliverables. In fairness steps 3 and 4 above should also involve your technical team to ensure that you have captured all of the key activities and products, whilst bearing in mind that you should always probe, question and qualify the activities and products suggested technically!
So the key task here is to allocate a number of days effort to each task, think in terms of both duration and actual effort. For example a client may take 2 days to review your document and in most cases you will need to answer questions and provide support during this time. Do not assume that your team can down tools and hit the bench for 2 days during the client review. For most projects this just wont work out well for you if you use such a mentality! Once you have allocated effort for each task you also need to allocate a resource type. Don’t use resource names, simply allocate a resource type such as Project Manager, Senior Technical Consultant, Principal Infrastructure Consultant etc.
Also remember that some activities require multiple resources to complete a task. A good example would be a workshop where you have your Project Manager, a Business Analyst, a Functional Consultant and a Technical Consultant in attendance. The effort of each of these will need to be defined. Once you have defined the effort and the resource types for each task, for each deliverable in each project phase then you are ready to build your MS Project Plan.

If you have followed Steps 3 to 5 correctly you will end up with a spreadsheet that looks something like the one above.
Step 6 – Risks, Assumptions, Issues & Dependencies
Documenting your key project Risks, Assumptions, Issues and Dependencies (RAID) is key to articulating your project plan to your client, for determining the level of risk in a project and guiding you in recommending your contingency levels. The RAID log can be a topic in it’s own right but for now keep it simple and use 4 separate tabs in a basic spreadsheet to track the risks, assumptions, issues and dependencies as you go through this planning process. The reality is that this will be a living document and it is best started as you consider Step 1 above. Make a note as the thoughts pop into your head and then reassess them at the end of the planning process. These items will be invaluable in answering the key question: Is this project deliverable? It will also help to inform your project contingency levels and help you to produce a robust proposal to the client.
Step 7 – Building The Project Plan
Now it is time to build your MS Project plan. Please, please do not try and build your project plan in an excel spreadsheet. It just not possible to fully articulate project dependencies or resource levels against project activities properly and you will end up with an ill-informed project plan.
First of all give your project a name and then define your external dependencies. For example create a dependency for the signing of your proposal and receipt of a purchase order from your client, create a dependency for the mobilisation of project resources or deliverables that the client needs to provide you with at the start of the project such as a business case or a detailed set of business requirements. Set each external dependency as a 0 (zero) day deliverable and allocate the client or other party to this dependency.
Next, build out your project governance section to act as the project home for overhead resources. The project manager, project assurance and project administration resources etc can live in this section. They will have a clear start and end date and will simply be allocated a percentage of time for the duration of the project.
Then build out your project life-cycle as a high level structure. Use the key steps in your project life-cycle (Step 2 above) as your project phases. Then use the information collected for your final estimates (Step 5 above) to define the key activities and project deliverables. Next it is important that you create the inter-dependencies between the key activities and products. Simply connect the activities in a simple but logical order as this will drive your overall timeline. Allocate the defined resources for EACH activity and then ensure that each activity has a duration & work effort. Do not leave any activity without both a duration and a resource allocated. You need BOTH for MS project to calculate the project work effort! Depending upon the size of the project that you are delivering you are likely to have anything between 150 and 3000 lines in your plan. Pay attention to the details and make sure that your estimates look and feel right – use your common sense to qualify what you see in the plan!

Example project plan with activities, deliverables, dependencies, resources allocated and a resource conflict shown by the ‘Red Person’ icon
Once the plan has been drafted you should always check the resource usage sheet to see what the resource profile looks like. All over allocated resources will be shown in red. Work to resolve any over / under allocations of resources manually by checking the activities in the plan, the resources allocated, the project dependencies and any overlapping activities for any single resource type. NEVER use the automatic resource levelling feature of MS project as 9 out of 10 times it will end in disaster! Once you are happy with your plan, leave it for a day and then review it again, making final changes to activities, timing, estimates and resource allocations.
Finally, get your prized project plan peer reviewed! Don’t be shy in sharing your work and getting constructive feedback. Walk your colleagues through the project plan and qualify that it is logical, representative of reality and that it’s deliverable by those that will need to execute against the plan. Take the feedback and incorporate it into your final plan. Don’t underestimate the importance of this step and don’t be foolish enough to think that your plan is perfect. It isn’t and never will be perfect as there is this demon called change that can blow it apart in the blink of an eye 🙂
So there you have it. A project plan based on a robust planning process! It will be deliverable and it will be supported by a set of technical estimates that are dependable. It will also have an informed RAID log that will support you in your discussions with the client as you socialise the plan or conduct commercial negotiations.
Remember that a plan is never finished. During the project it becomes a living document that you will use to track progress, slippage or scope change. You will of course baseline your plan during project initiation or at contract signing but it will never be truly finished until you formally close your project.
Enjoy!
BONUS OUTCOMES
Following the seven steps above will not only produce a quality project plan that you can be confident is deliverable but it will also produce the information that you need for a number of supporting artefacts. From your project plan you will be able to produce the following:
- A resource profile over time – Extract this (Copy & Paste) from your MS Project Plan into an Excel Spreadsheet and use this as the basis for any manual resource levelling that you may want to do. This gives you a solid basis for getting the right people with the right skills for the right duration to deliver your project successfully
- Price and Margin Analysis – Use the above resource profile to build out your margin analysis. Simply add another sheet to your resource profile spreadsheet, create a linkage to your resource profile sheet to copy over the resource names and the total effort and then apply a rate card, cost per resource and then add columns for your total cost, total price, margin and profitability. Each time you update your resource profile you will have an automatic update to your price and margin analysis. Very simple and invaluable as a PM!
- Project Structure – Use the overall roles defined in your project schedule to help you build out a quick project organisation that 100% matches the resource types that you need to deliver your project. This step is more manual and you will need to use Visio or PowerPoint but publishing a project org structure using your resource profile as the starting point is a great way of producing this important project artefact.
- Proposal / Business Case – Use your project plan to help you write your client proposal or your business case. The project plan that you have just built will provide you with the following key elements:
- Deliverables
- Milestone Dates
- Resource Profile
- Commercials
- Roles and Responsibilities
- Project Organisation
- Answer to the question: Is the project deliverable?!
- Score Card – You can use a combination of your project plan and the RAID log from your planning exercise to produce a project score card. These artefacts will help you to assess your proposed project and identify those areas of the project that are risky, need more management attention or that have significant external dependencies. Understanding these factors will help you to define the project delivery approach, level of project governance and will inform your thinking about project contingency!


